
Deliteful Tutorial (Part 5) - Enhancing the List View
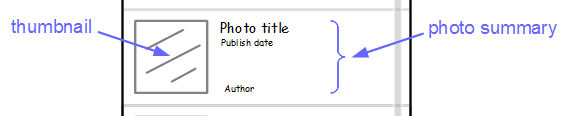
In the previous step of this tutorial we started to build our Flickr photo feed application. We will now refine it to display more information for each photo. Remember, we wanted to obtain something like this:
If you have chosen to get the tutorial application from the
ibm-js/deliteful-tutorialproject, switch to thepart5branch now:$ git checkout part5
Defining a Custom List Item Renderer
The deliteful List widget can be customized to some extent, but for this we will need to define custom item renderer.
An item renderer is a subclass of deliteful/list/ItemRenderer that defines the content of each list item.
Add the following code in js/app.js, before the refreshPhotoList() call:
photolist.itemRenderer = register("d-photo-item", [HTMLElement, ItemRenderer], {
    template: handlebars.compile("<template>" +
        "<div attach-point='renderNode'>" +
            "<div class='photoThumbnailBg'>" +
                "<img class='photoThumbnail' src='{{item.media.m}}'>" +
            "</div>" +
            "<div class='photoSummary'>" +
                "<div class='photoTitle'>{{item.title}}</div>" +
                "<div class='publishedTime'>{{item.published}}</div>" +
                "<div class='author'>{{item.author}}</div>" +
            "</div>" +
        "</div>" +
    "</template>")
});
This needs some explanations. The itemRenderer property of the deliteful List widget can be set to an instance of a
subclass of deliteful/list/ItemRenderer. For each element of the data source, an instance of the renderer class
will be created. The DOM contents of each item is defined by the template property,
which is parsed and processed by the handlebars
module. The template can contain bindings: for example, {{item.title}} will be replaced by the value of the title
property of each data item of the source.
In the added code we use two new AMD modules: "deliteful/list/ItemRenderer" (the base class of our
custom renderer) and "delite/handlebars" which contains the deliteful templating engine. Let's add them to
our dependency list:
define([
    "dstore/Memory", "deliteful/list/ItemRenderer", "delite/handlebars", ...
], function (Memory, ItemRenderer, handlebars) {
    ...
Add the following rules in css/app.css to style the item elements correctly:
.d-list-item .d-list-cell {
    line-height: 20px;
    height: 100px;
    width: 100%;
    overflow-x: hidden;
}
.photoThumbnailBg {
    width: 90px;
    height: 90px;
    min-width: 90px;
    background-color: #000000;
    text-align: center;
    line-height: 90px;
}
.photoThumbnail {
    max-width: 90px;
    max-height: 90px;
    vertical-align: middle;
}
.photoSummary {
    padding-left: 10px;
    padding-bottom: 0;
    margin: 0;
    position: relative;
    vertical-align: middle;
    height: 100%;
}
.photoTitle {
    font-size: 15px;
    font-weight: bold;
}
.publishedTime {
    font-size: 12px;
    font-weight: normal;
}
.author {
    font-size: 10px;
    color: #777;
    font-weight: normal;
    position: absolute;
    bottom: 0;
    text-overflow: ellipsis;
    white-space: nowrap;
}
We also need to modify the markup. We can remove the labelAttr that we added previously on the d-list element,
as the custom item renderer directly maps the data item properties to DOM properties in its template. In parallel,
we must set copyAllItemProps="true", which means that all the properties of the data items will be available to the
custom item renderer.
<d-list class="width100 height100" id="photolist" copyAllItemProps="true">
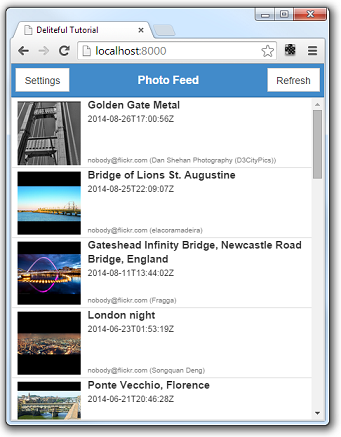
OK, let's try that, our list looks a lot better now:
Formatting the Date
Flickr returns dates in ISO format, which is not very user friendly. We want to format this better, and this is the opportunity to show that templates can contain any JavaScript expression. Let us add a function to format a date:
photolist.itemRenderer = register("d-photo-item", [HTMLElement, ItemRenderer], {
    ... ,

    // Formats a date in ISO 8601 format into a more readable format.
    formatDate: function (d) {
        return d && new Intl.DateTimeFormat("en-us", {
            year: "numeric",
            month: "long",
            day: "numeric",
            hour: "numeric",
            minute: "numeric",
            second: "numeric"
        }).format(new Date(d));
    }
});
And we use yet another AMD module for this, the "ecma402/Intl" project for internationalization,
let's add it to our dependency list:
define([
    ..., "ecma402/Intl", ...
], function (..., Intl) {
    ...
We also need to add a config object to the require.config call in index.html to say
which locales we want to load (just "en-us" for now, we will add more later).
require.config({
    ...,
    config: {
        "ecma402/locales": ["en-us"]
    }
});
Now let's modify the template to use the formatDate function, for this we replace the {{item.published}} binding
by an expression:
"<div class='publishedTime'>{{this.formatDate(this.item.published)}}</div>" +
(Note that, in binding expressions, this refers to the item renderer instance, and this.item is the data item
that the renderer represents. If you use a simple binding like {{item.published}}, you may omit the this. prefix,
it is implicit).
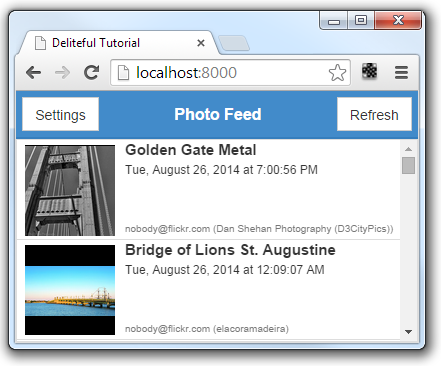
OK, now our dates are formatted more cleanly:
Adding a Progress Indicator
One last little thing we will do on this list view is to add a progress indicator that will spin while the request is
being processed. For this let's add this markup next to the d-list element:
<!-- scrollable list -->
<div class="fill">
    <d-list ...>
    </d-list>
    <d-progress-indicator id="pi"></d-progress-indicator>
</div>
Let's add it to our dependency list:
define([
    ..., "deliteful/ProgressIndicator", ...
], ...
(We don't need to add corresponding argument to the define callback since we don't explicitly use these modules in our code, we just need to have them loaded so that the delite parser can initialize them.)
Add this rule to css/app.css to center the progress indicator in the view:
.d-progress-indicator {
    position: absolute;
    top: 0;
    right: 0;
    bottom: 0;
    left: 0;
    margin: auto;
}
Finally show the indicator in the getPhotos function, and hide it in requestDone:
function getPhotos(tags) {
    requestDone();

    pi.active = true;
    ....
}

function requestDone() {
    ....
    pi.active = false;
}
We now have a nice feedback to show that the request is being processed:

Our list view is now completed!
Run the Demo
Click here to see the live demo: Deliteful Tutorial - Part 5
Next Step
We will now learn how to add a details view that will show more details when a user clicks a photo in the list.