
Deliteful Tutorial (Part 2) - A Quick Look at Deliteful Components
In the first step of this tutorial we have setup the tools and created a first deliteful application. Let's now go through the application source to get familiar with some deliteful components.
HTML Markup
Let's first have a look at the HTML markup of our application.
<!-- left menu side pane -->
<d-side-pane mode="push" position="start" id="leftPane">
...
</d-side-pane>
<!-- page content -->
<d-linear-layout class="page width100 height100">
...
</d-linear-layout>
The body contains two toplevel elements: <d-side-pane> and <d-linear-layout>. These are custom HTML elements
defined by deliteful (all deliteful components have a d- prefix).
Let's start with the second element. The <d-linear-layout> component is a container that stacks other elements
vertically or horizontally. It is used here to build the main page of the application.
<!-- page content -->
<d-linear-layout class="page width100 height100">
<!-- page content header -->
<d-linear-layout vertical="false" class="pageHeader">
<div><button is="d-button" iconClass="icon" class="toggle" onclick="leftPane.toggle()"></button></div>
<div class="fill titleStyle">deliteful app</div>
</d-linear-layout>
<!-- stacked content -->
<d-view-stack id="vs" class="fill">
<div id="first">
<!-- fill the first view with content -->
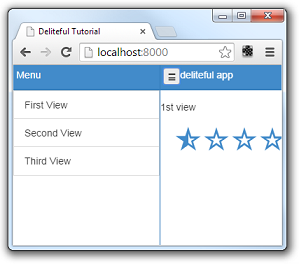
<p>1st view</p>
<d-star-rating value="0.5"></d-star-rating>
</div>
<div id="second">
<!-- fill the second view with content -->
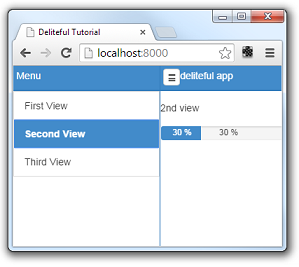
<p>2nd view</p>
<d-progress-bar value=30 max="100" essage="Uploading..." style="width: 50%"></d-progress-bar>
</div>
<div id="third">
<!-- fill the third view with content -->
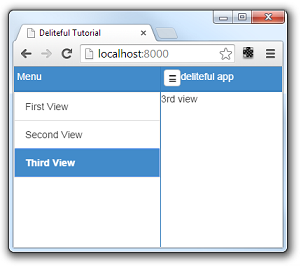
<span>3rd view</span>
</div>
</d-view-stack>
</d-linear-layout>
Note the width100 and height100 CSS classes on the toplevel d-linear-layout,
they indicate that it should fill the whole width and height of the page. These classes are defined in the
defaultapp.css style sheet that is included by the application generator.
The toplevel d-linear-layout element contains two children: another nested d-linear-layout element,
which will be the header of the page, and a d-view-stack element.
The nested d-linear-layout element has a vertical="false" attribute, which means that it will stack its children
horizontally. The children of the header are a button (nested inside a div) and another div that displays
the title text. The button has an onclick event listener to show/hide the side pane (see below).
The second child of the toplevel d-linear-layout element is a d-view-stack element. This is another deliteful
container that shows one of its children at time. In our default application it contains three divs,
one containing a deliteful d-star-rating element (visible on the first screen shot above),
a second one containing a deliteful d-progress-bar element, and a third one containing just standard HTML elements.
Let's go back to the first toplevel element of our application, the d-side-pane component. It is used to display
a sliding pane on the side of a main application view. It can be seen in action by clicking the top-left icon:
The d-side-pane contains elements with a similar structure as the main view, with a vertical d-linear-layout
containing a header (a nested d-linear-layout), but below the header we now have a deliteful d-list element. The
d-list is an important deliteful component that displays a list of items.
<d-side-pane mode="push" position="start" id="leftPane">
    <d-linear-layout class="height100">
        <!-- left menu header -->
        <d-linear-layout vertical="false" class="pageHeader">
            <div class="fill titleStyle">Menu</div>
        </d-linear-layout>
        <!-- left menu content -->
        <d-list id="list" on-selection-change="vs.show(event.newValue.id)" selectionMode="radio">
            {"label": "First View", "id": "first" },
            {"label": "Second View", "id": "second" },
            {"label": "Third View", "id": "third" }
        </d-list>
    </d-linear-layout>
</d-side-pane>
Note the on-selection-change="vs.show(event.newValue.id)" attribute on the d-list. It adds a event listener so
that when an element is selected in the list, one of the children of the d-view-stack in the main view is shown:
CSS
As usual when creating web applications, the CSS part is also very important, so you can have a look at the
css/app.css file which contains the CSS rules that define the layout and style of the page elements.
Note in particular that all deliteful components have a CSS class with the same name as their HTML tag, for example:
.d-side-pane {
    border-right: 1px solid #357ebd;
}
JavaScript
The default application contains some JavaScript code that you can often reuse to get started.
/* index.html */
require.config({
    baseUrl: "bower_components",
    paths: {
        "js": "../js"
    }
});
// Start the application.
require(["js/app"]);
The require.config calls tells the browsers where to find the various delite, deliteful and other libraries,
as well as the app in js/app.
The require(["js/app"]) call loads the js/app AMD module which will be the application entry point.
/* js/app.js */
define([
    "delite/theme!delite/themes/{{theme}}/global.css", "deliteful/ViewStack",
    "deliteful/SidePane", "deliteful/LinearLayout", "deliteful/Button", "deliteful/StarRating",
    "deliteful/ProgressBar", "deliteful/list/List", "requirejs-domready/domReady!"
], function () {
    document.body.style.display = "";
    list.selectedItem = list.source.get("first");

    /* app code will go here */

});
The define call loads the AMD modules containing the components used in the application.
The body of the application is initially hidden by a display: none style. This is a well-known technique to
make sure that the DOM will not be displayed before it is fully initialized by the delite/deliteful code. The
document.body.style.display = ""; line makes the body visible once everything is correctly setup.
Next Step
Now that you have a basic understanding of how to create a simple deliteful application, let's move to the next step where we will describe the application that we will create.